Fish Visual Checklist: Common Clues, Lookalikes, and Next Steps
Use this checklist to find strong fish visual clues, spot common lookalikes, and follow safe verification steps before trusting a single photo.
Quick answer for fish visual clues
Fish visual clues are the concrete, observable features in a photo—shape, fin placement, scale pattern, color bands, and notable markings—that give you the best starting evidence for identification.
Start by assessing a few high-value clues: body outline (elongated, compressed, rounded), fin counts and positions, distinctive stripes or spots, and the shape of the mouth. Those features often narrow candidates more effectively than overall color, which can change with light or handling.
Treat any single image as a first pass. Use visible clues to form a short list of likely species or families, then follow verification steps: seek better photos, add context (location, water type, size), and treat app or crowdsourced matches as research notes rather than final certainties.
What it means
When people search for fish visual clues they want a tangible set of features they can check quickly in a photo or at the water’s edge. That means emphasizing repeatable, measurable details—rather than transient traits like wet coloration or glare.
A visual-clues approach prioritizes traits that persist across images and observers: fin counts and rays, the relative positions of dorsal and anal fins, body depth vs. length, bar patterns, and mouth orientation. These clues reduce ambiguity between lookalikes that may share habitat or body color.
This method is practical for anglers, divers, aquarium hobbyists, and biologists doing field triage: it turns an uncertain photo into a ranked list of hypotheses you can test with a second photo, a locality check, or an expert query.
Key clues
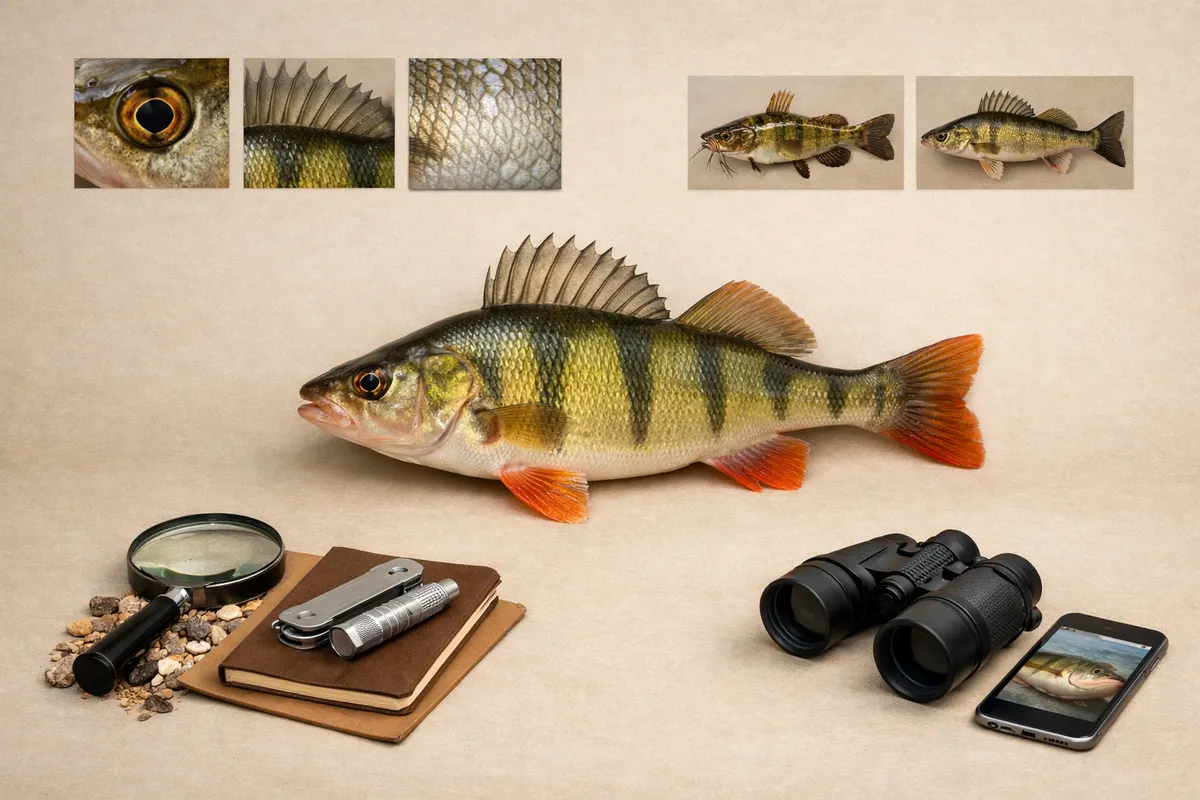
Below are the strongest, most reliable visual clues to inspect first. Use them in order: features at the top of the list typically eliminate more possibilities than softer traits like color or pattern brightness.
Take clear closeups of the head (left/right), a full lateral view, and a shot of fins spread where possible. Even one or two decisive clues can move you from dozens of candidates to a handful of likely matches.
- Body shape and depth — Is the fish long and thin (eel-like), laterally compressed (sunfish, angelfish), or deep-bodied (porgies, butterflyfish)? Body depth-to-length ratio is a quick filter.
- Snout and mouth orientation — Pointed snout vs blunt; terminal (front-facing), subterminal (slightly downturned), or inferior (bottom-facing) mouths separate feeding niches and families.
- Dorsal fin count and structure — Note whether the dorsal is a single continuous fin, two separate fins, or has distinct spines and soft rays. Many fish families have characteristic dorsal layouts.
- Anal fin rays and shape — The number of anal spines and soft rays is diagnostic for groups like wrasses, cichlids, and many reef taxa.
- Pectoral and pelvic fin position — High-set vs low-set pelvic fins and the size/shape of pectorals help distinguish similar silhouettes.
- Scale type and texture — Large ctenoid scales, small cycloid scales, or bony plates are visible clues when resolution allows; armor or keels are also diagnostic.
- Distinctive markings — Bold stripes, vertical bars, ocelli (eye-like spots), or a lateral line interruption are high-value identification marks.
- Color pattern zones — While color hue can shift, the arrangement of bands, patches, or contrasting edges (e. g. , dark margins on fins) often persists.
- Tail shape and length — Forked, rounded, truncate, or lunate tails indicate swimming style and can separate predators from reef-dwellers.
- Teeth and jaw details — Visible teeth, beak-like jaws, or protruding canine teeth are decisive for some groups (e. g. , pike, bass, parrotfish).
- Gill raker density (if visible) — Fine vs coarse rakers hint at diet (plankton vs larger prey) and can separate similar species.
- Proportions and scale counts — When possible, measure standard length vs head length, eye diameter relative to head, or count scales in a row; these numeric clues are powerful.
Step-by-step workflow
Turn visual clues into a short, testable identification routine. Work from broad to specific: rule out large groups first, then compare the remaining candidates side-by-side using high-value traits.
Keep each step quick and repeatable so you can apply the same checklist to other photos or specimens and evaluate consistency.
- 1) Secure context: note where and when the photo was taken — freshwater or saltwater, geographic region, habitat (rocky, sandy, reef, open water). Habitat eliminates many species quickly.
- 2) Capture or request three views: full lateral profile, head close-up, and dorsal/ventral or tail shot. Annotate each photo with scale (object or ruler) and orientation.
- 3) Record 3–5 high-confidence clues from the image: body shape, dorsal fin type, distinctive mark(s), mouth orientation, and approximate size. Prioritize traits listed in Key clues.
- 4) Narrow to family or genus: use a field guide or image search with those five clues. Compare multiple credible images and ignore matches that differ in several high-value traits.
- 5) Check lookalikes: for any remaining candidates, list the single trait that would separate them (e. g. , number of dorsal spines, presence of an ocellus). Try to photograph or confirm that trait.
- 6) Evaluate confidence levels: mark the ID as high-confidence (3+ matching high-value clues), partial (1–2 matching clues), or uncertain (relying on color or a single ambiguous mark).
- 7) Next steps based on confidence: high-confidence can be treated as a working ID; partial or uncertain outcomes should prompt additional photos, habitat details, or expert consultation.
Examples
Example 1 — Lateral stripe vs single bar: Two reef fish in a photo look similar at first because both are brownish. The decisive clues: one has a continuous lateral stripe from eye to tail; the other shows three vertical bars and a rounded tail. That single stripe moves the first fish into a different genus.
Example 2 — Mouth position separates lookalikes: Two freshwater species share size and color, but one has a strongly inferior mouth (bottom-feeding) and the other a terminal mouth (midwater feeder). Observing mouth orientation during your photo session can immediately separate them.
Example 3 — Dorsal fin structure resolves family: A shallow-water fish with a long continuous dorsal fin and visible spines belongs to a family different from a similar-colored fish with two separate dorsal fins. Even when coloration fades in the photo, fin layout remains diagnostic.
Limitations
A single photo can provide useful fish visual clues but rarely offers absolute certainty. Lighting, angle, crowding (multiple fish), and seasonal color changes can mislead. Be explicit about uncertainty in records and avoid claiming a definitive species name when only partial clues exist.
Separate likely outcomes into three bands: high-confidence IDs (multiple stable traits match), provisional IDs (some good clues but missing one or two decisive features), and uncertain IDs (relying largely on color or low-resolution details). Treat provisional and uncertain IDs as hypotheses, not facts.
Safety and use limits: do not assume edibility, toxicity, protected status, or market value from a photo. Those judgments require expert verification, legal checks, or lab testing. For conservation or regulatory use, always confirm with a vetted source.
- When to seek verification — If the fish is a protected species, a possible invasive record, or you need a legal ID for harvest or sale, stop at the provisional stage and consult a local biologist or fisheries agency.
- When photos are insufficient — Blurry images, extreme color wash, or partial views (only tail or head) reduce confidence dramatically. Try to obtain more angles rather than guessing.
- App and crowdsource caveat — Use automated tools or forum IDs to generate leads, but keep those results as notes. Verify matches with trait-based comparisons and, if needed, experts.
Next step: use Fish Identifier as a first-pass tool
After you note visible fish visual clues and take additional angles, try Fish Identifier on your device to generate candidate matches and comparison images. Treat app results as research leads, not final proof, and verify uncertain IDs with experts or local fish guides.
Frequently asked questions
What are the first fish visual clues I should check in a photo?
Start with body shape (deep vs elongated), dorsal fin layout (one or two fins, spines vs soft rays), mouth orientation, and any bold markings such as stripes, bars, or eye spots. Those traits eliminate many lookalikes before you compare finer details.
How do I tell similar species apart when color looks the same?
Focus on non-color traits: fin counts and placement, scale texture, head shape, and tail form. For example, two brown reef fish may differ clearly by whether the dorsal fin is continuous or split, or by the presence of an anal spine — traits that persist even when color is muted.
Can I rely on a single photo to identify a fish for legal or conservation records?
No. A single photo may suggest a candidate but is often insufficient for legal or conservation use. Agencies typically require multiple confirming traits, location data, or expert verification before accepting a record.
What should I do if I only have a low-quality photo?
Annotate whatever reliable clues you can see (silhouette, tail shape, any markings), note the location and habitat, and try to obtain better images or context such as size estimate or behavior. Use your partial clues to form a short list and label the result as provisional.